Antipyretics for children are prescribed by a pediatrician. But there are emergency situations for fever when the child needs to be given medicine immediately. Then the parents take responsibility and use antipyretic drugs. What is allowed to give to infants? How can you bring down the temperature in older children? What medicines are the safest?
Very often, children are interested in how to draw a fairy. Beautiful, magical creation, pleasing to the eye, what could be better for learning to draw? And adults may be interested in how to draw a fairy. For example, for a visual lesson for children. Fairy-tale characters of children can somehow interest them faster. Where to start? From the circle. A large, fluffy dress can hide the legs of a fairy, plants - her hands, but not a single fairy is without a face. So, first we need a circle. A perfectly round face should not be done, it is better to slightly elongate to the chin. At the same time, in the area of \u200b\u200bthe forehead, our circumference should be larger.
Next, you can draw the contours of the face. Perhaps with a slightly lighter touch of the pencil. And don't forget the two ovals: the eyes. Lips should not (adult advice) be made too sexy. But they should also not be made narrow, otherwise your fairy will have a too angry expression on her face. The nose can be depicted with two dots or with a neat, slightly curving line. Two points are, of course, easier to draw. As you can see, if you want to learn how to draw a fairy with a pencil, no special secrets are needed. You must have at least basic knowledge of how to draw a person.

It is best to draw a fairy by breaking the process into different stages. After a circle with outlines of the face has appeared on a piece of paper, you need to think about the ears (will they be?), And also about whether the hair will hide them. Often already at this stage they begin to draw hair, but this is a mistake that can spoil the impression of the drawing. It is necessary to imagine for yourself, if necessary - with lines in the figure - the placement of the body of a fairy in space. And here the hair will only interfere. Further, if our fairy is supposed to have wings, and most fairies have them, some even play the role of a distinctive feature, then we first need to figure out how the wings are located in space. And do not interfere with their hair, for example.
Fairy body: position in space

The body of a fairy is an important point in the drawing. If you don’t know how to draw a fairy in stages with a pencil, then you need to decide on the body in the second place - after the face. The body, which is at an obtuse angle in relation to the face, will show that the fairy is flying. And the dumber the angle, the more dynamic the body will be. If it is located at a right angle or close to it, then such a location in space means only one thing: the fairy is standing or hovering in space. With an acute angle, she can stand, slightly leaning back, lie down, sit, lean back, or fly back. True, the latter is not recommended to be depicted if you have not had experience in drawing fairies before. Not a very easy task.
The body can be drawn in an oval, but not particularly strong, and so, barely outlined with a pencil so that it can be quickly and easily erased without tormenting the paper. In general, a draft drawing should be done carefully, with light, careful touches to the paper. Then you can make two small ovals in the main oval - the upper part of the body and the lower one. And carefully erase the transition between them, so the fairy has a waist. The lower part of the body will most likely be a dress or a skirt, the upper part will be the upper part of the dress, respectively, as an option, a blouse or something like that. The transition can simply be made smooth, by choice, or you can outline it somehow neatly. For example, a neat rectangle with a fastener in the center will look like a delicately made belt. You can also pretend that the fairy has a bow on her belt. Or a scarf.
The next step is to outline the line of the skirt. The longer the skirt, the less the legs will be visible. And don't forget the proportions! Fairies, of course, are fabulous creatures, but they should look natural in a completely human drawing.

Fairies must have arms, at least hands. If you do not want to draw fingers, then you can cheat and depict a fairy in gloves. There will also be fingers, but they can be designated conditionally. Also, the hand can be hidden, but hiding both hands is not worth it, because the posture in which the hands are wound behind the back, especially in a state of activity, does not look quite natural.
We must not forget about the need to detail the blouse, the dress itself. It is also worth drawing in detail the skirt. You can make a skirt ordinary, you can - in the form of flower petals. In the latter case, we need to draw a flower bud inverted and enlarged to the desired proportions. And remember: even if we can’t see, as a viewer, exactly where the arms and legs are located, we still need to know where they are in order to correctly draw the part we see. And how exactly the body of a fairy is located in space, for example.
Features of drawing fairies
Among other things, you need to take into account the structural features of the body of a fairy. Does she have wings? What part of the back do they grow from? What about the tail? Some fairies, oddly enough, have it. Sometimes how to draw a fairy tail is not very clear. In such cases, there is no need to reinvent the wheel. Just draw the tail of a reptile, so you will make your fairy unusual, different from all other fairies. You can cat tail, lion tail, for example. Or domestic cat. In general, you can even find a detailed master class on the Internet on how to draw a fairy tail in stages, but in short, you need to draw an elongated rectangle, round the end, make the rectangle itself flexible and movable. And at the end - a brush or a fluffy end of the tail, perhaps a thickening!

In general, it remains to finish the fairy wings (you can wings of a butterfly or dragonfly), and your drawing is ready. As you can see, the instruction on how to draw a fairy in stages is not so complicated and scary. And quite feasible. After drawing with a pencil, you can start using colors. And if you want to learn how to draw, for example, a Winx fairy, then you can find specific workshops. And see how others do it. There are also enough phased drawings on the Web, including those made online, as well as drawings at various stages of readiness to figure out what's what.
Another fairy, no less popular and beloved by children, is a character from the famous fairy tale about Peter Pan. If you are going to learn how to draw a Dinh Dinh fairy, keep in mind that this character is really recognizable. That is, there should be somewhat less amateur performance. You can first try to draw all the same just a fairy. And then move on to the character. And keep in mind that you can pretty well fill your hand by redrawing the picture of the Dinh fairy from books. I mean illustration.
Today we will find out. A fairy is a mythological creature that came to us from Western European folklore, stories about her were passed from mouth to mouth. It was believed that a pretty sorceress was capable of various tricky tricks: hiding things, tangling her hair. Looking at a cute girl with wings, it's hard to imagine such a thing. After all, as a rule, this is the image of a miniature, exquisite girl with a magic wand, from whom we expect the creation of a good miracle. So let's try to draw it just like that. So let's get started.
How to draw a fairy
Step one. Let's draw a circle - a head. On - an auxiliary cross with two horizontal lines, which will help us a lot to draw a face. And then we build the axial lines of the body: a short neck, narrow shoulders, a curved spine, hands with palms and a pelvis. Let's draw the legs, almost connecting at the bottom, in the middle of them in the form of a circle we will show knee-joint. In place of the foot - two circles.  Step two. Between two horizontal auxiliary lines, draw a pair big eyes: eyelids, eyelash line, pupils. The bottom point of the vertical line should rest against the chin. Based on this, from the circle we will draw a rounded line below. On the side we show a small ear. : it should start at the level of the eyes and end at the level of the nose. From above we will depict the winding bangs of the fairy.
  Step three. Let's draw, which the bangs did not cover. Let's outline the neck, passing into the hand, and the wing line (similar to) stretches diagonally upwards from it. On the crown, we will continue to draw a hairstyle.
  Step four. On the face - A mop of hair continues upward from the head. From behind the head we will show: it is not wide and slightly pointed at the top. Let's finish the second wing from two parts: the upper one is more elongated, the lower one is rounded. We will dress the fairy herself in a corset.
  Step five. Now our task is to draw the hands along the center lines. In place of the palms, we will show thin fingers. In the right hand is a wand to work miracles. And from the skirt down we draw zigzags, zigzags, zigzags ...
  Step six. Just a little more. Let's draw the fingers of the second hand. Down we continue the lines of the legs along the already drawn center lines.
  Step seven. Let's show the other leg. And now from the balls that are in place of the feet, draw a pointed cone down to get a small graceful leg.
  Step eight. And now we take the eraser in our hands and carefully remove all the auxiliary lines. You can circle the eyes and wings a little brighter.
  Well, how did it work? So the fairy is ready to transform into bright colors. Colored pencils will help you with this. I hope you learned the lesson. I tried very hard to create very easy and useful drawing lessons for you. Just four or five steps and you will become real artists. Do you think I'm cheating? Well, try to draw yourself.
We have already studied the lesson on drawing the fairy Rosetta, but then the beautiful fairy looked a little different - she had a sword in her hand, and a bandage over her eye. After all, she was a pirate back then. And today Rosetta came to us in her favorite pink dress.
We have already told you about the character of the Rosetta fairy, that she loves cleanliness and order very much. Her gardens are a true work of art! And for good reason, because she is a garden fairy! Rosetta is also a fashionista, and she loves to delight us with bright and stylish outfits, of which there are a lot in her large wardrobe!
Draw Fairy Rosetta
In order for the Rosetta fairy to look similar, draw a sketch at the first stage. This is done simply - just copy the fairy figure from the following picture (try to make it slightly noticeable so that the sketch does not stand out later):
The next steps are to draw parts of Rosetta's body, her hairstyle, outfit and wings. A step-by-step example is shown in the following pictures:


Final stage. Color fairy Rosetta. Her dress and shoes are pink, her skin is fair, and her hair is red.
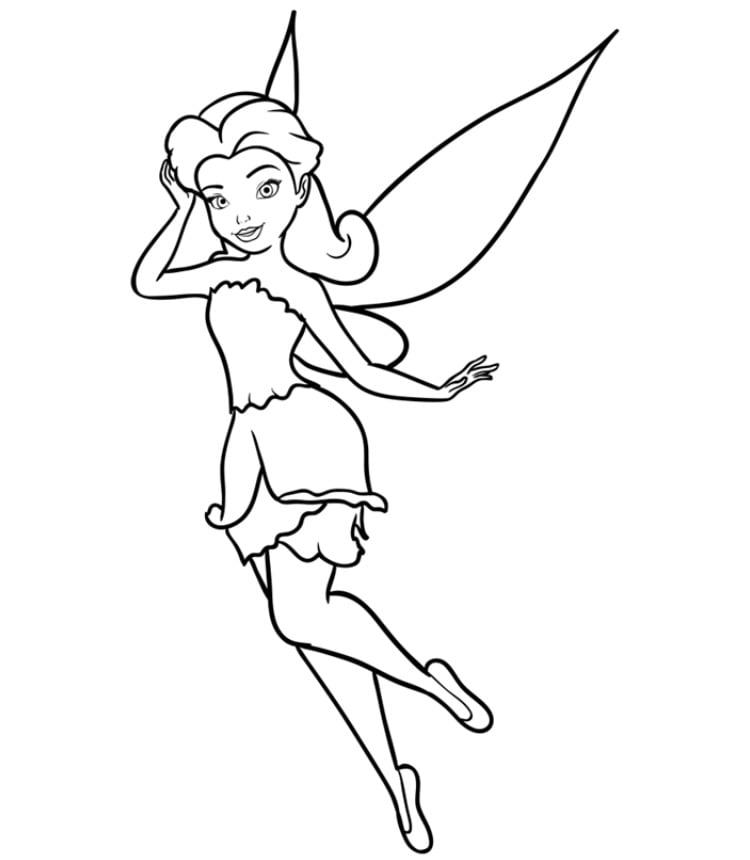

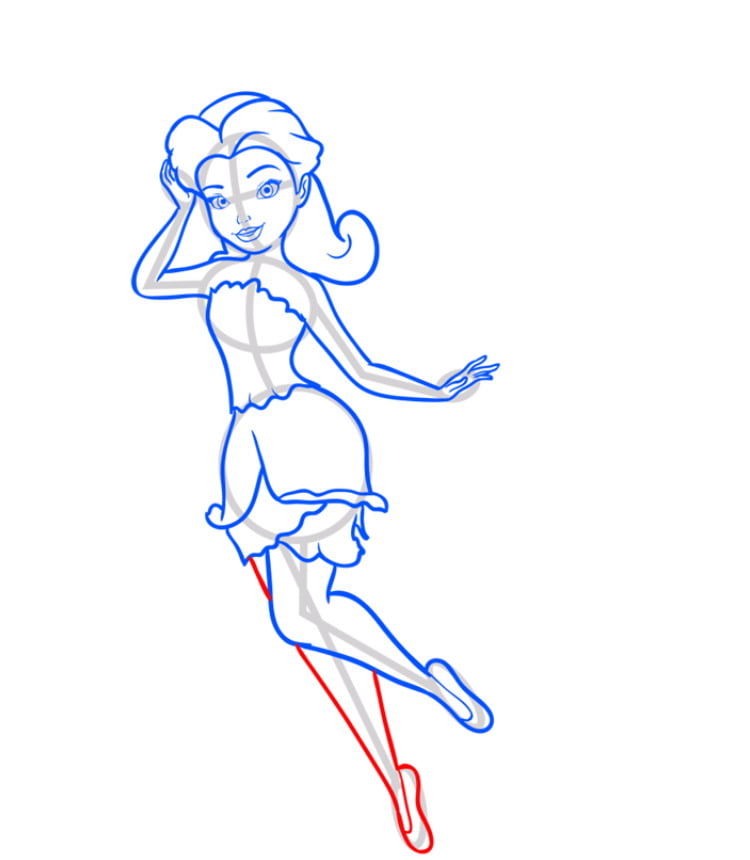
Option 1 - How to draw a fairy Tinkerbell (Tinkerbell) in stages
source

In this lesson we will draw a fairy girl with wings like a butterfly.
STEP 1

Outline a round head and auxiliary lines in it. Draw a line for the neck and curved body. Draw the shoulders with a slightly uneven line passing into bent arms. Draw a short skirt on the hips. Legs draw straight lines converging in one line.
STEP 2

Make a more elongated oval of the face with a pointed chin. Draw the eyes between the guide lines. The outer corner of the eyes is on the top line, and the inner corner is on the bottom line. On the face, draw the contours of the strands of hair.
STEP 3

Make the nose small right on the line of the circle, draw the line of the mouth below. Draw the eyes. Give your hair volume. Outline the arm and upper wing.
STEP 4

At the crown, draw a bun of hair. Draw the wings on the back. The upper wing is longer, while the lower wing is small and rounded. Draw the outlines of the dress.
STEP 5

Start drawing the second hand, and in it a magic wand. Draw fingers for the second hand. The bottom of the skirt seems to be torn or made of leaflets. Make it like the picture.
STEP 6

Draw the outlines of the legs and arms.
STEP 7

It remains to draw one more leg contour and small legs in shoes. And on the shoes round pompoms.
STEP 8

Gently erase the auxiliary lines with an eraser. On the knees, add a couple of strokes.
RESULT
Fairy Ding Ding is ready. You can color the drawing with paints or pencils.
Option 3 - How to draw a fairy Serebryanka step by step
source

Let's draw another fairy with long black hair. Take a piece of paper, a soft pencil and an eraser.
STEP 1

Outline the main elements. Draw the head in the form of a circle and auxiliary lines. Draw a line on the back with a small arc. Circle the hips. Legs and arms by lines.
STEP 2

Make a contour of the face as in the picture. More elongated with a pointed chin. Make the ear pointy. Draw the contours of the body, arms and thighs. Next, make legs with outstretched socks.
STEP 3

Now separate the legs with a line. Draw the second hand and fingers on the hands. On the auxiliary line, start drawing the upper eyelid with long cilia. Also make the nose and mouth. Draw hair in large smooth waves with a curl at the end.
STEP 4

Start drawing the dress. Make small flounces on the chest. Draw the skirt of the dress in the form of a flower with the same curl on the hem as on the hair. Draw the eyes and lips. Draw several lines of hair. On the legs, add the outlines of the shoes. And on the back are long pointed wings.
STEP 5

Erase the guide lines and color the fairy.
RESULT
Note that there are blue highlights on the hair. And the dress is painted in the form of a gradient. In the background, add some stars or fairy dust to create a magical atmosphere.
Option 4 - How to draw a Forget-me-not fairy in stages
source

In this lesson we will draw Forget-me-not. Let's figure out how to draw a portrait in stages.
STEP 1

Start drawing the oval of the head and the auxiliary lines in it. Outline the neck, arms and torso.
STEP 2

Make the outline of the head as in the picture with a pointed chin. And two strands of hair near the face.
STEP 3

On the auxiliary line, draw the eyes with a rounded line. Above them are eyebrows. Draw a snub nose along the vertical line. And just below a sweet smile.
STEP 4

Draw hair sticking out like fire on the head.
STEP 5

The next step is to draw the contours of the neck, body and arms. Do it with smooth lines.
STEP 6

Draw a few hair lines on the hairstyle. Now draw the elements of clothing.
STEP 7

It remains to draw a few wings of an elongated shape. Also put a pattern on them.
STEP 8

Erase the guide lines with an eraser. Have you succeeded?
RESULT
Color the drawing with pencils or paints. What do you usually like to draw?
6 option - How to draw a fairy Fauna step by step
source

This is a fairy of animals, she can talk with them, as well as with insects.
STEP 1

Outline the oval of the head and make auxiliary lines. Below, draw the shape of the body and hips with smooth lines.
STEP 2

Make the contour of the face as in the picture, sharpen the chin.
STEP 3

On the auxiliary line, draw the upper eyelid and thick eyelashes on it. Make a small nose a little lower in the center.
STEP 4

Now draw your own eyes. They are slightly different. Since they are in perspective, and one of them we see a little less. Show an expressive look with a line of eyebrows. Also draw the mouth.
STEP 5

The next step is to make a voluminous hairstyle and draw long strands of hair.
STEP 6

Draw the neck and V-neck of the clothes.
STEP 7

Now draw the contours of slender arms and clothes.
STEP 8

Draw thin fingers. The second hand is not visible.
STEP 9

STEP 10

Make a long braid thicker at the roots of the hair, and thinner at the end.
STEP 11

It is time to draw pointed long wings, and a little lower, a smaller rounded wing.
STEP 12

Draw patterns with swirls different sizes. They are slightly larger at the base.
STEP 13

Draw two small petals on the head.
STEP 14

Erase the guide lines and you can color the drawing.
RESULT
Make shadows in the hair, under the chin, on the arms and clothes. Be sure to make highlights in the lightest places.
7 option - How to draw a fairy Vidia step by step
source

Vidya is the fastest fairy, she wants to prove her superiority to everyone. Let's draw it in full growth.
STEP 1

Outline the head around and the auxiliary lines inside. Next, draw a schematic skeleton. Body trunk, hips, arm and legs.
STEP 2

STEP 3

On the head, draw a beautiful hairstyle with long strands, they curl a little. Draw the eyes and iris. On the center line, draw the nose and mouth. From the waist, start drawing the curved lines of the dress. Draw long fingers.
STEP 4

Now draw long wavy hair. Draw a V-shaped neckline on the chest. Draw eyes and thin eyebrows. Make elf ears. Decorate the skirt with leaves.
STEP 5

Add elements to the clothes. Draw the outlines of the legs. And on the back the wings are rounded lines.
STEP 6

The next step is to decorate the clothes. Make a floral ornament on it. Also draw the shoes.
STEP 7

It remains to erase the auxiliary lines. Fairy is ready.
RESULT
Color in the same color scheme. On the body and on clothes, make shadows on the right.
Option 9 - How to draw a fairy Iridessu step by step
source

Iridessa can control lighting and create rainbows or lights.
STEP 1

Draw the skeleton of the body. Make the head in the shape of a circle, and in it auxiliary lines. Make the body and hips, legs and arms schematically.
STEP 2

Start drawing the contours of the body and face. Make the chin pointed as well as the ears.
STEP 3

Draw the eyes on the auxiliary line, nose and mouth in the middle. Draw the contours of slender legs and wings. Draw thin fingers and hair.
STEP 4

The dress is made up of petals. They flutter a little. Next, draw the hair, shoes and wing. In the eyes, show the pupils, above them the eyebrows and below the mouth.
STEP 5

Gently erase the auxiliary lines with an eraser.
RESULT
You can also draw the background. On the right side of the body, add shadows. Make the dress golden and the shoes too.
Option 10 - How to draw fairy Rosetta step by step
source

Rosetta is a garden fairy with good manners. She likes red and pink dresses.
STEP 1

Start as usual with the basic elements of the body. Draw the head in the form of a circle, inside the auxiliary lines. Also outline the body, arms and legs.
STEP 2

Make a contour of the face as in the picture. Wide cheekbones and a pointed chin. On the auxiliary line of the eyebrow. Draw the contour of the body with smooth lines.
STEP 3

Now you can draw the eyes and eyelashes. Draw the contours of the body. Add long hair with smooth lines.
STEP 4

The next step is to draw a cute dress with wavy edges. Draw fingers and individual hairs on the head showing the shape of the hairstyle.
STEP 5

It remains to draw long wings with pointed ends. And a strand of hair on the side.
STEP 6

Erase the auxiliary lines and the drawing is ready.
RESULT
Take paints or pencils and color the drawing. You can make a small pattern on the wings.
Option 12 - How to draw Peter Pan and Tinkerbell (Tinker Bell Fairy) step by step
source

Let's portray a kiss of a couple in love.
STEP 1

Start with Peter's head, then Tinkerbell's head. Draw an auxiliary line in the middle. Outline the neck and shoulders.
STEP 2

STEP 3

Now depict a lush hairstyle with a bun at the top.
STEP 4

The next step draw a closed eye and a curl behind the ear.
STEP 5

Draw the contours of the face and neck of Peter Pan with a pointed ear.
STEP 6

He also draw a closed eye and a couple of strokes in the ear.
STEP 7

Make a cap on your head.
STEP 8

STEP 9

It remains to draw the neck, shoulders and arms of Tinker Bell. Also make an outline of the clothes.
STEP 10

Remove the auxiliary lines and you can color the lovers.
RESULT
We hope you succeeded. Can be colored with pencils or paints. The more you like.
Option 13 - How to draw a Tinkerbell fairy (Tinkerbell) in chibi style step by step
source

This drawing option is suitable for everyone. It will be easy for beginners, there is no need to observe the proportions of an ordinary person.
STEP 1

draw big circle and auxiliary lines. Draw a curved line for the body.
STEP 2

STEP 3

Draw a bun on the head. Make the eyes large, at the level of the auxiliary line. Next, depict the bend of the body, and make the edge of the dress torn. Draw the second hand.
STEP 4

The next step is to draw the iris and pupil. Slightly above the eyebrow. Make a cute smile along the middle line. On the back, add wings and finish the legs. Also do not forget about the ear and dress.
STEP 5

Sometimes we want to feel a piece of magic, diversify our lives with some miracle. On the one hand, such thoughts are somewhat irrational. After all, everyone knows that magical moments in the literal sense of the word do not exist. However, at heart we are all children, and no one can take away our faith in miracles. And to get even closer to them, a few tips on how to draw a fairy can help us. You may think that this is quite difficult to do, and you are absolutely right. But still no picture was created easily. Therefore, take a pencil, a landscape sheet and proceed.
Before you draw a fairy, you should decide on the position of her body. Most often they are depicted sitting and pressing their knees to their chest, as well as directly in flight. In any case, the choice of her pose remains with the artist. However, there is one detail that is required in any case. This face. You should start your drawing with it, marking it with an oval and dividing it with preliminary lines, so that later it would be easier to draw its parts. It is worth noting that the eyes can be drawn large, because the larger they are, the kinder it seems. Do not forget about the hair, fairies are distinguished by their splendor and beauty. A miniature nose and lips, frozen in a smile, will complete this pretty face.
When we learn to draw fairies, images of heroines pop up in our thoughts.

cartoons. As a rule, in our drawings we focus on them, and many of us will definitely remember mermaids. And then another question arises: "How to draw a fairy tail?" In principle, there should be no problems with him, since many of us have already portrayed him in childhood. You should draw the usual only slightly elongated. By the way, it is recommended to think about whether your fairy will be water or earth, since some positions of the bodies for the first option are simply not acceptable. Now with thin lines it is necessary to designate the torso and limbs. Do not forget about proportions, because if your sorceress's arms are of different lengths, she will lose her beauty. After all this is done, you need to draw up her finished silhouette with contours. And at this stage, the difficulties are over.

In all the recommendations on how to draw a fairy, Special attention given to the wings. And this is quite understandable, because they are her main and main decoration, the element that distinguishes her from the appearance of an ordinary person. They can be depicted in different ways, but most often the preference is given to the wings that butterflies possess. You can dream up in drawing this element, and for this it is enough to go through all the flying creatures in your head. Even bat wings can look quite cute and gentle on fairies. It remains only to dress our sorceress and add a few accessories that diversify the picture. Don't forget to hand it to the fairy. And you can also make her a real queen of dryads by putting a diadem on her head.
Now you know how to draw a cute creature that will gently wink at you from the wall on which you hang your drawing. And the good impressions left after you, like a master, drew a pencil across the sheet, will accompany you tomorrow, bringing a great mood.