Antipyretics for children are prescribed by a pediatrician. But there are emergency situations with fever when the child needs to be given medicine immediately. Then the parents take responsibility and use antipyretic drugs. What is allowed to be given to infants? How can you lower the temperature in older children? What medications are the safest?
The Halloween holiday is gaining more and more popularity every year. First of all, because this is a great reason to organize a fun and mystical party with friends.
.jpg)
Halloween decorations
For this mystical holiday, decorating the apartment plays an important role. It is advisable to spend Halloween in a dark room with colored lamps.
Halloween colors
The traditional colors of the holiday are bright orange, black and purple. Black and white are also used.
Pumpkin for Halloween
The main symbol of the holiday is the pumpkin. Pumpkin lanterns can be placed throughout the apartment. This is not only a tribute to tradition, but also a very beautiful element of the interior. The “facial expressions” of pumpkins can be completely different: scary, cheerful, angry, surprised, shy. It all depends purely on your imagination. Pumpkins can be painted with felt-tip pens, and the carving can be made into shapes.
Halloween Posters
Of course, posters with funny inscriptions will cheer up the guests, for example: “Dear guests, please don’t bite!”, “Be careful - you may be eaten,” “Announcement. I am changing the lock, the total area of 5000 square meters for a three-room apartment with amenities and a telephone. Signature: Ghost", "Announcement. A healthy and attractive vampire needs a donor” and others.
Halloween Accessories
The premises are also decorated with spiders, snakes, owls, bats, black cats, witches' brooms, silhouettes of the moon, skeletons, and ravens.
1.
Ghost
Cover with white cloth Balloons, inflated with helium and your ghost will fly. Old white sheets look great in this case! Draw a face with a black marker. You can also make ghosts out of just white balloons by drawing faces directly on them.
2. Skeleton
Cut out skeleton bones from cardboard and pin them to the curtains. Bones can be painted with fluorescent paints.
3.
Web
On a sheet of whatman paper, draw a web about 1 cm thick and carefully cut it out. Stick the web on a wall with a dark background. You can plant several spiders on the web.
Halloween Costumes

Costumes are one of the most necessary and interesting elements of any holiday, be it corporate parties or a celebration in the family circle (more details on the website http://www.galaktica.ru/korporativnie_vecherinki/). Search the Internet and study mythical creatures and choose the look that suits you. With the help of a costume, you can “turn” into a witch, a vampire, a ghost, a skeleton, a ghoul for one night... But you don’t have to instill fear and horror in everyone with your image, you can get used to the role of a good-natured beast that will make you hold your breath from tenderness, and not out of fear.
You can also decorate any costume with original accessories in the form of spiders, snakes, bats, lizards made from foil, beads, beads, wool, and scraps of the brightest fabric.
1.
Mummy Costume
A very light and effective costume that can be made in 15-20 minutes. You will need several wide bandages and an assistant. All you need to do is wrap yourself tightly in these bandages.
2. Ghost Costume
For this costume you will need a plain white sheet, paint and scissors. Draw the ghost's face with black paint. In place of the eyes, cut small holes. To help the sheet stick better, wear a black hat.
.jpg)
Mystical Halloween treat
Halloween is a mystical holiday, which means that a mystical treat is needed to celebrate it. The table setting decor should reflect the overall festive mood.
Cover the table with a black tablecloth and arrange orange and white candles to create a mysterious atmosphere. Use dark napkins tied with silver ribbons. Place plastic spiders and snakes on the table.
The queen of the table should, of course, be the pumpkin. We offer you a recipe for an unsurpassedly delicious cheese fondue in pumpkin.
Cheese fondue in pumpkin
1 medium sized pumpkin
2 tbsp olive oil
1 clove garlic, chopped
1 onion, finely chopped
200 g - mushrooms, chopped
1 red chili pepper, finely chopped
150 ml - dry white wine
1 tbsp corn flour mixed with 1 tbsp water
3 sage sprigs, chopped
600 g - grated cheese (like Emmental or hard Swiss Gruuere)
150 ml - double cream
Chopped sage for garnish
1. Cut off the top of the pumpkin and set aside. Clean the inside of the pumpkin of seeds and fibers. Rub the inside with salt and pepper and brush with half the oil.
2. Preheat the oven to 180 ºС. Place in an ovenproof dish and bake for 45 minutes.
2. Heat the remaining oil in a frying pan, add garlic, onion and chili, fry for 3-4 minutes. Add mushrooms - cook for 3 minutes. Add wine and bring to a boil. Remove from heat, stir in flour, herbs and cheese. Stir until cheese melts; add cream.
3. Pour the mixture into the pumpkin and sprinkle with chopped sage.
4. Serve with black bread.
This pumpkin will definitely decorate your Halloween table!
Lemonade "Green Slime"
Fill an ice cube tray with water mixed with green food coloring. Freeze them to create green ice cubes. Pour lemonade into glasses and add prepared green ice. Cut the lime into slices and attach to the side of the glass. Jelly bugs, worms and spiders, which can be found on sale, will be an interesting decoration. Throw them into glasses to improve the mood of your guests.
Orange with "brains"
To prepare you will need:
1 orange,
15 g gelatin,
50 g cherry jam,
Wash the orange. Cut off the cap and cut out the face. Carefully remove the middle. Soak gelatin in cold boiled water for 1 hour. When the gelatin has dissolved, place on the stove and bring to a boil. Mix with cherry jam. Pour into a shallow plate and refrigerate for 2-3 hours. Place the frozen jelly into the orange and cover with a lid.
Halloween Contests
"Get an apple from a bucket of water"
Two buckets or bowls of water are placed on two chairs, five steps from each other, and apples with cuttings are floating in them. It is necessary to prepare two towels for drying in advance. Two teams of several people are organized. A very fun competition begins - which team will get the apples out of the bucket without using their hands. Participants “catch” apples with their teeth and lips, plunging their faces into the water.
"Pin the tail on the donkey"
On a thick sheet of paper, draw in advance the outline of the donkey - a rear view with a circle where the tail should be located. An imitation tail is made from string. A piece of paper with a picture of a donkey is attached to the board. 3-4 blindfolded participants take turns trying to more accurately find the location of the tail.
Halloween jokes and gags
Be sure to include raffles in your holiday program. For example, if couples are present at the party, in the midst of the event the girls can change costumes and hide their faces with masks, and let the companions figure out where the “evil spirits” are. If the holiday is organized with your family, remember the movie “The Addams Family”, make a party in its style, dressing the whole family in Adams.
.jpg)
Halloween fortune telling
1.
Before going to bed on the night of November 1, the girl should eat a piece of herring without drinking anything. In a dream, the betrothed must bring her a glass of water.
2.
Place a coin, a key, a ring, a shell, a button, and a heart in a pan with mashed potatoes. IN complete darkness the girl pulls out one item using a fork. A coin means wealth, a key means success and power, a ring means marriage, a shell means travel and relaxation, a button means loneliness, a heart means happy love.
3. It is believed that if you put an apple under your pillow on Halloween night and make a wish, and eat it in the morning when you wake up, your wish will definitely come true.
Let there be as many fun and interesting days in your life as possible! Happy Halloween!
Prepared by Maryana Chornovil
In the fall, many artists begin to think about how to draw something interesting for Halloween. In this tutorial we will be creating an awesome spooky Halloween poster.
Final image:
Part 1: Creating a Document
Step 1
Create a new document (File - New) (File > New) (CTRL + N) and select A4 size.

Step 2
Rotate the document (canvas) horizontally (Image - Rotate canvas - 90 clockwise) (Image > Image rotation > 90 CW).

Step 1
Fill the background layer with green. To do this, use the tool Fill(Paint Bucket) (G).
Create a new layer (Shift +CTRL + N) and use the Gradient radial type (Gradient Tool) (G) draw a light green spot in the center of the background. Move the gradient layer up a little and lower the layer opacity slightly.

Step 2
Tool Text(Horizontal Type Tool)(T) write a phrase and place this text layer at the top of the document. Then, below, write the word “HALLOWEEN.” For the phrase at the top of the document, the font used was Ghastly Panic (You can choose any horror font).
For the word "HALLOWEEN" the font was Arial Black (you can choose a similar one).

Step 3
Click on the word “HALLOWEEN” with the tool Text(Horizontal Type Tool) (T) and click on the icon Create Warped Text(Create Warped Text). Refer to the screenshot.

Step 4
Apply a filter to the text layer Relief(3D - Relief - Text layer) (3D > Repousse > text layer). Refer to the screenshot.
Step 5
Reduce the opacity of the test layer a little, create a new layer and use a small hard brush to paint each letter.

Step 6
Draw each letter on a separate layer. Now, apply the command to each letter Hue/Saturation(Hue/Saturation) (CTRL + U). You need to achieve the effect of a light spot in the center of the text.

Step 7
Add clipping mask to the layer with the first letter and paint some parts of it yellow. In this illustration, the lighting should be directed from the bottom to the center.
Use the tool Eraser(Eraser Tool) (E) to soften and reduce the opacity of the applied brush effect. Draw all the letters in this way.
Step 8
Light blue paint a little shadow, and then change the blending mode of the blue layer to Multiplication (Multiply).
Step 9
Multiplication(Multiply) and with a hard brush draw a shadow on the drops flowing from the text, as shown in the screenshot:

Step 10
Create a new layer and paint a small yellow spot on it with the Radial Gradient tool. Flip the gradient layer horizontally ( CTRL + T) and erase the top part a little.

Step 11
Duplicate all the letter layers (Ctrl + J), and then merge the duplicates into one layer (CTRL + E). For foreground and background colors, choose dark green and yellowish green shades. Apply to the merged layer with letters filter reticulation(Filter - Sketch - Reticulation) (Filter > Sketch > Reticulation).

Step 12
Change the blending mode of the Reticulation filter layer to Soft light(Soft Light) and reduce the layer opacity to 40%.

Step 13
Make the text layer active, create a new layer in blend mode Multiplication(Multiply) and fill it with a soft light blue gradient. Draw a gradient line from the top of the document and from side to side. Use an eraser to go over the gradient layer to soften it a little.

Create a new layer in blend mode Overlap(Overlay) and fill it with a yellow gradient.

Step 14
On a new layer with the name « liquid" add a white highlight to the flowing drops.

Part 3. Drawing a pumpkin
Step 1
Now let's start drawing a pumpkin. To create it we will use orange and green colors. Layers using orange color will be set to blending mode Multiplication(Multiply) to create shadows, and the layers using green color will be set to blend mode Overlap(Overlay) to create highlights.
Step 2
Draw green steam coming out of the pumpkin, add some spots on the pumpkin and a shadow underneath it.

Part 4. Assembling the poster
Step 1
Place the first texture on the image (File - Place) (File> Place). Place this texture under the layer with the pumpkin and text, and adjust its size to the size of the entire document (CTRL + T). Change the blending mode of the texture layer to Separation(Divide).

Step 2
Duplicate the texture layer (Ctrl + J), change the duplicate blending mode to Multiplication ( Multiply) and erase the part with a soft eraser. Tool Magic wand ( Magic Wand Tool) (W) select the edges of the texture and delete.

Step 3
Place the second texture above all layers, change its blending mode to Overlap(Overlay) and reduce the opacity to 73%. Erase the texture from the pumpkin and text:

Step 4
Add an adjustment layer Fill) or Photo filter(Layer - New Adjustment Layer - Photo Filter) (Adjustment Layer > Photo Filter). Place this adjustment layer under the text layer.

Step 5
Duplicate the yellow gradient layer (Ctrl + J) that is located below the text layer, stretch it horizontally and vertically and erase its bottom part.

Step 6
Make the pumpkin layer smaller (Ctrl + T) and duplicate it (Ctrl + J). If necessary, set all orange layers to the Multiply blending mode.

Step 7
Add layer styles to the top text layer:

Step 8
Duplicate the layer with the text “HALLOWEEN” (Ctrl + T), place it below and apply a layer style to it Shadow(Drop shadow).

Step 9
Duplicate the adjustment layer Photo filter(Ctrl + J) and place it above all layers.

Step 10
Create a new layer (Shift + Ctrl + N) and use a brush to paint a light stroke around the text, the pumpkin, and the pumpkin's mouth, eyes, and nose.

Step 11
Select a soft round brush and in the palette Brushes(F5) configure it as shown in the screenshot. Using yellow and dark orange, paint subtle patches of dirt on the pumpkin.

Step 12
Change the blending mode of the second texture layer to Overlap and reduce its opacity to 44%.

Step 13
Now let's create the feeling that the pumpkin is lying on the floor. Don't forget to draw a shadow on the ground under the pumpkin and add soft lighting.

Step 14
Go to the background layer, double click on it to unlock it. Now run the command on it Hue/Saturation(Hue/Saturation) (CTRL + U) to add some glow.

Step 15
Go back to the pumpkin and add even more light, as well as deepen the shadows.

Step 16
Apply an adjustment layer to the text layer Brightness/Contrast(Image - Correction - Brightness/Contrast) (Image > Adjustments > Brightness/Contrast).

Step 17
Select the pumpkin's face and add a bright yellow highlight to the center of the highlights and a soft blue shadow around the edges.

Step 18
Apply the command to the text layer Hue/Saturation(Hue/Saturation) (CTRL + U).

Step 19
Darken the edges of the pumpkin's face and draw more dents and cracks on it.

Step 20
Use a small, hard brush to paint the web.

Step 21
Finally, on the letter O we will draw an eye. Draw a white circle between the letters and the shadow layer. Add a style to the circle layer Inner shadow(Inner Shadow). Add a clipping mask to the eye layer, then create a new layer and draw the details: capillaries and light areas.

Final image:
Translation: Slutskaya Svetlana
“Modern educational wall newspaper on the topic Halloween »
Subject:Halloween
item: English language
Grade: 8
Abstract: Wall newspaper "Halloween » completed on the website wikiwall.ru . WikiWall or, as it is called, a Wiki wall is a service that allows you to create a page and make it available to a group of users. Participants can type text, post their notes, pictures, videos. Wall newspaper link "Halloween» http://wikiwall.ru/wall/ebf3a2a099756dabc83b9bdbb374a87f/


Content:
wall newspaper contains:
1) information about the history of the holiday
It is believed that Halloween appeared around 4000 BC, which means that Halloween has existed for over 6,000 years.
The homeland of Halloween is usually considered to be Ireland.
2) symbols holiday
On the night of November 1 the whole world will celebrate Halloween
The colors of Halloween are orange and black, because orange is associated with the fall harvest, and the black one is associated with darkness and death.
3) puzzles
It looks like a huge orange head. We may also use it for a cereal.(pumpkin)
All kids like eating them. They are tasty and sweet. However, they may cause some teeth illnesses.(sweets)
It is a woman. She always flies on a broom in the sky at night.(witch)
4) children's poems :
| Trick or Treat! Trick or Treat! Give me something good to eat. Give me candy. Give me cake. Give me something good to take. | At Halloween We mask our faces and wear strange hats, and moan like witches and screech like cats, and jump like goblins and thump like elves, and almost manage to scare ourselves! |
5) customs:
According to the belief, if someone puts their clothes on the left side and goes back to Halloween, then at midnight he or she will be able to see the witch.
6) pictures


Creating a thematic online newspaper in the WikiWall environment can be used to organize student project activities. For joint editing and design of an online newspaper, you can use various ways to organize activities. You can organize student activities in a computer lab. This project can be presented both during and after school hours, and can also be used as an interactive form of work.
How to make Halloween crafts with your own hands from paper can be seen using several examples.
1) Using baking paper, make garlands in the shape of ghosts and ghosts. The only material you need is paper.
2) Draw a ghost template on accordion-folded paper and cut it out without cutting the sides to make a garland.

3) It’s enough to just make a pumpkin out of paper. To do this, cut wide and short strips of orange paper, fasten them in the form of a fan, form a pumpkin and secure on top with a stapler. Decorate with green petals.

4) It's easy to make a ghost garland.
To do this you need:
- white napkins;
- threads;
- cotton wool;
- Pictures.

1) Place a ball of cotton wool in the center of the napkin.

2) Wrap a cotton ball in a napkin and tie with thread. Thus, the head of a ghost was obtained.

3) Make some ghosts. Their number should depend on how long the garland is needed. Next, draw a face with a felt-tip pen and string it on a thread.

How to Make Halloween Decorations for a Room
The colors mainly used for Halloween are black, orange and white. Black means night, orange because the symbol of the holiday is a pumpkin, white symbolizes fear and communication with ghosts and spirits.
Jack Lantern
Jack Lantern is a symbol and attribute of celebration, which is carved from a pumpkin. To do this, you need a medium-sized pumpkin, cut off the top and remove the core with seeds. Next, use a felt-tip pen and a stencil to draw a scary face on the side and cut it out with a knife. Place and light a candle in the finished pumpkin.

Small pumpkins will make candy bowls, and elongated pumpkins will make flower vases. Draw or stick drawings of spiders, skulls, and skeletons on the peel.
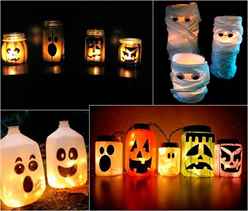
Candles
Candles are also an attribute of the holiday. They are based on ordinary glass jars, which can be painted, painted, or wrapped in paper or fabric.
Flowers
Dead and dry flowers in black, white or orange are suitable. For example, dry nettle or reed flowers. Ribbons and sparkles are also suitable for holiday decoration.
Leaves
Since Halloween runs from October 31 to November 1, and it's fall at this time, it's worth taking advantage of the yellowing leaves.

Mummies and ghosts
Such decorations can be easily made using white fabric, preferably transparent. Place balloons with a painted face under the fabric.

One idea is a do-it-yourself model of a mummy. If there are mock-ups, wrap them with gauze or a bandage, or fold clothes or fabric into a human shape and also wrap them with a bandage.

Posters
Paintings, posters and photos with classic Halloween characters, namely ghosts, witches and vampires, spiders, bats, can be hung on the walls. Place silhouettes of characters made of cardboard and black paper on the windows. Attach black spiders on cobwebs to the walls.


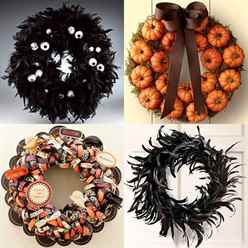
Wreaths
Wreaths are a type of Halloween decoration that can be hung on doors or other suitable places. Material for wreaths: hay, woolen threads, dry leaves, branches.
Finished decorations
If you don’t have time to make decorations for the holiday, you can buy them in a store or order them on the Internet, where there is currently a fairly large variety of attributes.
You can watch the hall decoration for Halloween in the video.