Antipyretics for children are prescribed by a pediatrician. But there are emergency situations with fever when the child needs to be given medicine immediately. Then the parents take responsibility and use antipyretic drugs. What is allowed to be given to infants? How can you lower the temperature in older children? What medications are the safest?
Coming home, every person wants to feel completely protected from negativity, especially that hovering in the open spaces of the streets. He calms down as soon as he finds himself behind a high-quality, reliable door, equipped with a good, strong lock.
Installing a lock on a door separating the home space from the outside world is a very complex and very responsible process that does not accept inaccuracies and haste. Here every little thing and detail takes on special importance. However, if you scrupulously follow the correct technological process and show extreme care, such work can be done by a completely ordinary person who does not have highly specialized knowledge or skills.
Where to start installing a door lock with your own hands?
It is necessary to clearly decide where to start and how to competently begin installing locking devices on the door. First you need to choose a lock option, which is not so easy to do. On today's market you can find a wide range of imported and domestic samples, differing in their quality characteristics and price indicators.
Watch the video on how to install a lock on a door with your own hands
The purchase of a specific model directly depends on numerous components, the most significant of which are operating conditions and pricing policy. Although, in this situation there is no need to strive to get excessively cheap, since such savings are not justified in practice.It is more advisable to spend some money one day and buy an expensive, but high-quality and reliable lock. Otherwise, you will have to regularly waste time and cash to purchase cheap products that have only one advantage - a low price.
Types of door locks
Today in construction markets you can find three popular types of locks suitable for use on doors (entrance doors).
1. Padlocks– are primarily used for locking gates and large doors located on hangars or garages, all kinds of sheds, etc. This type of locking device is not popular for closing doors in residential buildings or apartments. For this reason, they will not be subject to further consideration.
 2. Rim locks– very simple to install, but well-preserving locking structures. Such locks are locked externally with a special key, and on the inside of the door with a revolving handle, with the additional use of a metal chain for safety.
Read also: Paving stone path (photo): types of paving stones, laying methods
3. Mortise locks- a particularly common option, characterized by better external aesthetics and greater installation complexity. Such mechanisms do not interfere with the attractiveness appearance door leaves. In terms of reliability, they are somewhat superior to their overhead counterparts.
Each of the presented types of locks has its own disadvantages and advantages. However, none of the options, even the most reliable and expensive, can guarantee good protection of a house (apartment) in the event of illiterate or careless installation.
 Attention! To fully ensure the safety of your own home and your family when installing a door lock yourself, you must strictly follow the rules and technical principles of a competent sequence of work!
Required set of tools
To minimize the time spent on installing a lock, you will need a pre-prepared set of necessary tools. To perform such work there is no need to buy any expensive, special equipment. Usually, everything you need is present in every home.
 To install the lock you will need:
- hammer (mallet);
— electric drill with a set of drills of different diameters;
- chisel and chisel;
- tape measure and “hard” ruler;
- square and pencil.
Explanation! Installation of locking mechanisms in a metal door is quite specific and differs significantly in the complexity of the process. Because of this, this installation will not be analyzed in this article!
Installing a mortise lock
Let's consider the installation of a mortise lock in the entrance wooden door.
Mortise types of locks received this name due to the fact that their entire base is completely immersed in the solid door (wooden) leaf. This provides a fairly reliable degree of protection against all kinds of intruders.

1. Preparation
Before working manipulations begin, the door must be fixed so that the door can be freely approached from all sides, and the structure itself must not move in any way. This installation will allow for accurate marking and carry out the necessary installation steps with optimal quality and accuracy. Installing a locking mechanism in a door located between adjacent rooms is no different in technological nuances from installing a lock in the front door.
2. Cutting a groove for the lock body
The initial stage of work consists of cutting out a groove cavity directly under the “body” of the lock. Before this, it is necessary to attach the back surface of the prepared lock to the end surface of the door, which is supposed to be deepened into the door and trace its outline with a pencil.
Then, you should begin sampling the nest. First, using an electric drill, many channels are drilled within the markings.
Read also: Do-it-yourself fuel pellets: advantages and disadvantages, scope of application, home production
Upon completion of drilling, it is necessary to level the internal surfaces of the socket. This leveling is done with a chisel and chisel. It is important to control the evenness of insertion of the lock. There should be no distortions or displacements.
 Advice! It should be taken into account that there is no need to simultaneously drill the nest to its full depth into the wooden base. It’s better to move 1 cm deep!
After completing the selection of the nest, you need to test placing the “body” of the lock into the groove made. If it fits in freely, then you can begin the next stage - cutting out a niche for the front plate of the lock. It is necessary to attach the lock to the corresponding place on the edge of the door and trace the outline of the strip. Then, using a chisel and chisel, the required depth of wood is selected so that the outer plank is placed flush with the end of the wooden door leaf.
3. Cutting a hole for the locking mechanism
Manipulations for inserting the lock continue, and the next procedure will be the installation of the locking structure of the lock. For this purpose, a lock is applied to the door surface, taking into account the adjustment for the thickness of the outer strip. The exact locations for drilling are marked. The channels are carefully drilled out using a fine-diameter drill, and then finishing is done with a chisel.
 Clue! As an alternative, you can use a thick-diameter drill. They can create holes for mounting lock cylinders in 2-3 passes. You need to work carefully here, otherwise it’s easy to ruin the wooden door!
Do not forget about drilling additional holes if you are installing a lock with handles and an additional latch. A through-hole will need to be drilled to accommodate the rod that connects the handles, screws, and latching tab switch. If you make the slightest error during assembly and installation, the defect will quickly appear, for example, the “tongue” will be blocked behind the outer lock bar.
Once all the manipulations are completed, all that remains is to place the lock in the prepared niche and secure it with screws or self-tapping screws.
Useful point! If you use mounting screws, you should first drill thin holes-channels to facilitate the tightening process!

4. Installation of the lock response mechanism
Performing this manipulation is the final stage of the work. It is necessary to make grooves for the lock bolts. If there is a latch, then it is mounted.
Indicative markings are also made here, but they need to be done especially accurately and carefully. There are many methods for applying it, however, we will focus on considering the most easily feasible method.
You need to start by lubricating the end of the latch and the bolt with regular chalk. Then, the door should be closed and the key turned in the inserted lock. The smeared areas of the latch and bolt will leave a characteristic mark on the door frame, indicating the place for cutting the socket recess.
Very often, when changing doors between rooms, we are faced with the question - how to properly install a door handle with a lock? With the help of this article, you will be able to install a lock on your interior door quickly and, most importantly, correctly, avoiding the mistakes made by many inexperienced people. In fact, this is not a complicated process at all; it takes up to half an hour for an experienced master, but an inexperienced person in this matter can suffer for several hours.
In this article we will look at the installation of the most common lock design today. This lock consists of the following parts:
Lock mortising tools
 To install an interior lock, you need a minimum set of tools; you most likely already have some of them, but if you have to buy something in addition, you will not incur large financial costs.
- Roulette and pencil;
- Screwdriver or drill;
- Stationery knife;
- Chisels 10 and 20 mm;
- Spade drill or 23mm forstner drill;
- 2 mm drill;
- Wood crown 54 or 50 mm depending on the thickness of the door;
- Masking tape.
This is a list of the best tools you will need. Special kits for inserting locks are sold; they are relatively inexpensive, but it will be even cheaper to purchase everything separately. Often, such kits include a 22 mm feather drill; it is also suitable, but then you will have to widen the hole for the latch with a chisel. 
Making holes for the handle of the lock mechanism
Like any installation process, the installation of a lock begins with markings. But before that, let’s protect the door leaf from accidental damage. To do this, we use masking tape to cover the end and plane of the door at the intended installation location of the lock, this is a distance of approximately 90 to 110 cm from the floor. Pasted masking tape will not only protect our door from damage, but also make markings on it much more convenient.
First of all, mark the height of the door handle with the lock. Most often, the handle is placed at a height of 1 m from the floor level. We measure this distance with a tape measure and put a mark on the plane of the door with a pencil.
When purchasing this type of lock, it always comes with a template for accurately marking the location of the holes. The cylinder mechanism of the lock may differ in diameter from different manufacturers, so purchase a wood crown after purchasing the lock. If your lock kit did not include a template, you can print them from this article as pictures and use them when installing the lock. 

Gently bend the template along the line of the door ledge and attach it to the door from the end. Depending on the thickness of the door leaf, use a sharp object (a self-tapping screw or the tip of a feather drill) to mark the centers of the holes according to the template from the end and on the plane of the door. 
Using a screwdriver and a wood bit, drill a hole in the plane of the door. 
Advice: When drilling, be careful not to drill through the entire door at once. When, while drilling, the guide drill appears on the back side of the door, stop and start drilling with a crown on the other side, this way you will definitely avoid chips on the plane of the door leaf.
The next step is to drill a hole for the lock latch. Using a previously applied mark using a template on the end of the door, using a 23 mm feather drill, we drill a through hole to the previous one. 
Keep the drill strictly perpendicular to the door, otherwise in the future the latch may become oblique and jam during operation.
The next step is to insert the latch into the end hole, align it with the edge of the door and trace it with a pencil along the contour of the decorative frame.  After this, we take out the latch and, using a stationery knife, make an incision along the marked line in the top layer of the door leaf. And only then, using a chisel, we select the hole for the lock latch. The depth of the hole should be slightly less than the thickness of the latch frame; later, when you tighten the latch with self-tapping screws, it will be pressed into the wood and become flush with the plane of the door.

Advice: Many beginners immediately begin to cut under the latch with a chisel; this is incorrect, since the door leaf is covered with a film that can be damaged beyond the cut line with a chisel, so cut off the film first.
After selecting the groove, insert the latch into place and first, using a 2 mm drill, drill out the holes for the self-tapping screws and tighten the latch into place. If the latch fits into the hole tightly, then use a chisel to cut off the contact points between the latch and the hole. 
Let's start installing the handle. The handle is assembled according to the instructions supplied with it. When installing, pay attention to the location of the closing tongue on the handle; if there is one, it should be located inside the room.
On one of the cylinder mechanisms there is a rotating pin and holders for mounting screws. Remove the decorative rosette from the mechanism using the pin wrench from the kit and mount it in place, screw the second cylinder mechanism on the reverse side. 
When tightening the screws, do not overdo it - pinched cylinder mechanisms will not work as expected.
Install all parts of the handle in place according to the attached instructions, and the work on installing the handle is completed. In fact, this is done much easier than it seems; you can watch a video in which you will clearly see the entire process of installing the lock with your own hands.
Installation of the lock mate
The last step in installing a door lock on an interior door will be installing the counter part on the doorway.
Close the door and make two marks on the doorway based on the width of the lock latch. 
Measure the distance from the corner of the door to the beginning of the latch. 
You should have the same distance from the edge of the doorway to the beginning of the recess of the counter part. It is necessary to maintain this distance so that in the future the closed door does not move back and forth due to air movement in the apartment and does not knock. 
If the answer needs to be recessed into the door jamb, then we place it in place and outline its outer and inner contours with a pencil. If there is no need to recess, then we outline only the inner contour. It all depends on the gap between the door and the jamb. 
Using a drill of a suitable diameter (you can also use a feather drill, if the hole then does not protrude beyond the answer), drill a hole for the lock tongue and fasten the answer in place, having previously drilled 2 mm holes for the screws with a drill. 
Do not forget to widen the holes for the screws to a depth of 2-3 mm, since there are protruding parts in this place on the back side of the answer.
We install the striker in place by tightening it with self-tapping screws and try to close the door; if there is excess play, we eliminate it by bending the tongue on the striker. 
The insertion of the lock into the interior door has been completed, all that remains is to clean up the accumulated debris and enjoy the new handles on the doors.
Lock mortise with cylinder
Very often a situation arises when you need to install a lock on a door that already has a handle. Any lock with a cylinder is suitable for this. 
Such locks have a rectangular shape and therefore the insertion process may seem difficult without the use of special tools. In fact, such locks are installed quite easily and with a minimum set of tools. You can place them at your discretion - above or below the already installed handle.
Lock installation sequence:

Installation of the lock mate:
- On the open door, we pull out the bolt (the retractable part of the lock) of the lock, that is, we close the lock with a key and, leaning it against the doorway, we mark what height we will have the counter part, focusing on the edges of the crossbars;
- Using a tape measure or square, measure the distance from the edge of the door to the middle of the lock and transfer this distance to the jamb of the doorway;
- Using a feather drill, we drill a series of holes according to the markings and then combine the resulting holes with a wood drill;
- Having previously secured the response part to the jamb, use a utility knife to cut along the contour, and then use a chisel to select the countersunk hole for the response;
- We install the counter part in place and check the functionality of the lock again.
Also, such locks often come with handles; the sequence of inserting such a lock does not change, only the operation of drilling a hole for the handle is added.
Well, that's it, the lock is cut in!
Be sure to watch the video on inserting a lock with a cylinder, perhaps in it you will notice some subtleties that you did not understand from the article.
If you have any questions, you can ask them in the comments. Good luck with the renovation!
If you decide to install interior doors with your own hands, it is worth noting that the easiest way is when the insertion of door locks and hinges is not done with your own hands, but at the manufacturer’s factory. As a rule, the manufacturer carefully selects such accessories, is reliable and has excellent performance characteristics. Read more about choosing door locks. When buying doors with installed fittings, however, you may encounter some difficulties in choosing. The most common thing is that the color or design is not suitable. For example, you want a gold-colored lock, but the manufacturer says chrome. Or you need Italian magnetic locks AGB, with silent closing like Morelli, with a plastic tongue, but they offer steel. Regarding hinges, you can get by with little expense - buy door hinges without a mortise. A universal loop without an insert does not look so aesthetically pleasing, but still.
There is always a way out - just buy what you need, cut in the locks/hinges with your own hands and install. It is not worth saving on fittings, since a failed mechanism can significantly complicate the further operation of interior doors. Exactly the same lock or door hinges may no longer be released, and an analogue, as a rule, will not “fit” into an already formed groove. We recommend embedding and installing silent or magnetic locks AGB, Morelli (Italy). For more than 10 years now, the installation dimensions of these products are the same and you can easily replace them as needed, although they simply do not break.
So the locks, universal or hidden hinges have been selected, purchased and brought, you need to install them yourself. For example, for unfamiliar fittings, we first draw a diagram of the upcoming insertion in the real size of the AvtoCAD program for automated installation, but you can mark it according to the manufacturer’s instructions, especially if the insertion of the lock and hinges is done by yourself. Marking is an important stage, it is necessary to pay special attention to it. “Measure twice, cut once” - it works! Otherwise, the product is damaged, the supplier will not exchange it for you, and this is a considerable financial loss. The marking directly depends on the type of lock and its features. It is important to dance from the hole under the handle. If you do not take this into account, then the door handles may end up at different distances from the bottom of the door leaf, and if the doors are installed in close proximity to each other, it will come out - oops or oops! When making calculations and markings, use a square, tape measure, pencil, awl or construction knife.
Do-it-yourself insertion of door hinge locks - methods
1. Using a drill and chisels - the old-fashioned method
The most common is what is called the “household” option.
Marking and inserting an interior lock
We take a tape measure and measure from the bottom of the canvas, at the end where the lock will cut in 95 cm (this is our standard, 100 cm is possible), apply a square, draw a transverse line and transfer the markings to the plane of the canvas, to mark under the door handle. Marking is done with a sharp pencil or awl.
We take the lock and use a square to measure the distance from the front plate to the middle of the square hole of the handle and apply the result on the plane of the canvas on both sides. We apply the lock to the end of the canvas, so that the line drawn in advance for the handle is in the center of the hole in the square and mark the upper and lower edges of the lock. We will drill this size. Next, use a square to mark the center of the canvas and draw the center line of the insert.
After marking for the lock and along the drawn center line, drillings are made on the end part of the canvas with a pen (usually 14-16 mm, depending on the thickness of the lock), as often as possible from each other. In order not to drill out too much, a notch is made on the feather drill to the depth of the lock using iso or masking tape.
The trick is to avoid catching the adjacent hole with the pen, since a drill rotating at high speed can suddenly jam, get stuck and damage the door. Then the groove is formed using several flat chisels, first removing excess wood along the blade, and then cleaning the side planes so as not to split the blade. Then holes are drilled for the handle, and, if necessary, for the cylinder (key) or screwdriver. It is important to drill holes on both sides of the canvas, and not through it! A lock is inserted into the formed groove, aligned with the drilled hole for the handle, its overhead, decorative strip is outlined with a sharpened pencil and the final selection is made with a chisel.
That's it, the lock mortise is done by hand!
Mortise of the lock mate
The counter part or “response” is cut in after the door block is installed. The markup is very simple. We close the door and, through the pretend gap, mark the lower and upper edges of the latch. We draw transverse lines on the box. Next, use a square to measure the distance to the edge of the tongue on the door and transfer it to the frame. This will be the limiter for the upcoming drilling and installation of the answer.


We drill two holes with a pen, and select the central part with a chisel. We attach the lock strike plate, drill holes for the screws and fasten it. We try - everything works. The answer should be deepened only if its thickness exceeds 1 mm. This is done with a chisel, having previously outlined the screwed-on mating part.
Marking and inserting door hinges
The trick is that marking and inserting hinges should begin with the door leaf. And so our door is 2000 mm, and the hinge is 200 mm, we measure 20 and 160 cm from the top of the leaf along the end, draw transverse lines, apply the loop parallel to the end of the leaf below the line and mark the edges with a sharp pencil.


It is more correct to mark exactly the loop that will subsequently be installed in this particular groove, since the factory stamping may differ. We take it with our own hands, and with the help of a chisel, and as shown in the video, we cut the lower and upper hinges into the door.
Another feature is the insertion depth. It happens that the gap between the parallel folded parts of the hinge is less than 2 mm, and the requirements for the hinge gap of the door block are just 2 mm. In this case, the loop needs to be deepened a little less. There may be a gap of more than 2 mm, then the loop still cuts flush with the plane of the end! Thus, you will have to come to terms with the hinge gap of the assembled block, but take this point into account when calculating, marking and filing the top element of the box, since it is standardly 6 mm, 4 mm from the rebate part and 2 mm from the hinge part, respectively.


The next stage is inserting the loops into the box element of the block. So the hinges are cut into and installed in the canvas, we attach the box and mark the edges of the hinges. We apply the loop to the marks parallel to the door frame and trace it with a pencil.


There is one correct nuance. We should take into account in advance the fact that the thickness of the door leaf and the width of the quarter frame from the seal to the edge may be different, but we really need a good rebate, that is, a tight (but not too tight!) fit of the seal to the leaf when the door is closed! To do this, before inserting the loops, we measure these values.


Let’s say the blade is 40 mm and the quarter is 42 mm, what should we do? Everything is very simple, you need to cut the loop into the box 2 mm deeper into the seal than into the canvas. But this is initially incorrect, since in this case, a deep-set hinge will expose part of the mortise, and when opening/closing the door, it will begin to wipe against the frame or frame, producing an unpleasant creak. Therefore, it is more correct not to recess the hinges in the box, but to push them out on the canvas and by the same 2 mm.
Flaws
- There is a high risk of damage to the door leaf coating as a result of a slip drill or chisel, especially if the tool is not sharpened to razor level before starting work! Sharpen cutting tools, use new drills,
- there is a great risk of simply splitting the canvas through inept actions or, say, stabbing, which will then significantly affect the strength and durability of door blocks and structures,
- you may not like the aesthetics of the inset, especially if you have no experience in “wood carving”,
- it will take a long time, but “long” is not something that should frighten a novice craftsman eager to cut into locks and hinges with his own hands,
- The list can be continued, but the lock in the interior door has already been installed with your own hands, and this is the main thing!
Advantages
- in skillful, diligent and diligent hands, there may not be all the shortcomings, do not be alarmed,
- the cheapness of the tools used, especially if you practice “household”. Do not buy frankly cheap chisels and feather drills!
2. Inserting hinges and locks into doors using a hand router.
The technology depends on the type of equipment used. There is a technology of template milling, when all manipulations are carried out according to a pre-prepared template or using a “ruler”, using cutters of different diameters and lengths. There is, of course, professional equipment, where everything is thought out and adapted for the work. In any case, the basic principle is rotating at a speed close to 25 thousand rpm. a milling cutter with the help of which the correct insertion of hinges and locks into an interior door occurs with your own hands. For example, in our work we use more than three types of milling cutters from the manufacturers Makita and Virutex, various templates and a Spanish template holder, screw and spiral cutters of different diameters from “CMT” Germany.
The markings for inserting with a router are no different from household ones, and the milling itself has a number of features, which will be discussed below.
As for the door lock, cutting it in with your own hands using a router is carried out using a standard ruler that comes with the equipment, using cutters of different diameters. In general - nothing complicated, the main thing is that the stroke of the collet with the cutter provides it with the necessary immersion depth, to the height of the lock, respectively. In the video, a do-it-yourself lock using a router is made offset to the left edge. This is another subtlety of installing silent AGB locks and more. The counter part of the lock with the tongue is rounded and should be installed along the edge of the box, so in order for the lock to look beautiful, you need to take this into account when inserting it, moving the lock along the canvas if necessary.
Do-it-yourself cutting of hinges with a router has a number of features. On the door leaf, everything is similar to the lock, using a ruler we select the plane, depth and parallel edge, then we form the end edge with a chisel of 30-40 mm.
The trick is that in order for the end edge to turn out beautiful and accurate, the chisel must be held perpendicular to the plane at the moment of hitting with a hammer, chopping and cleaning the wood in several stages, a little at a time, this is important.
It is more difficult to embed hinges into the door frame with your own hands, since, unlike the door leaf, which has one pressing plane, the frame consists of two planes. Essentially, you will have to mill the lower plane and press the equipment platform to the upper one. The task is not easy, and therefore our milling cutters have special modifications to the platform. Of course, there are all sorts of devices, carriages, templates and even a special loop router made by Virutex. We didn’t use carriages, you get tired of making templates for each loop, but loop Virutex is a thing, but it’s expensive, and we don’t need it. How can you cut hinges into a box with a simple router, but with your own hands - I don’t know, I’ve reached a dead end, ideas will come up, I’ll add to the article.
Flaws
- high cost of equipment,
- all sorts of nuances associated with inept use.
Advantages
- Precise, high-quality, neat insertion of locks and hinges into interior doors, made by yourself!
The front door is a reliable barrier to intruders entering the house. An important point is the choice of a lock for such a design, which allows for increased protection. Locks come in different types and classes of resistance to burglary. It is necessary to correctly approach the process of selecting and installing locking products. Installation is not difficult, but follow the instructions.
Installing a suitable lock into a wooden door
Attention! Wooden doors are often installed in country houses. The question arises, how to embed. The process itself is typical, so it is important to follow the instructions, selecting the appropriate tools for this. The lock itself must fit the door in order to achieve positive results and durability of use.
What tools are needed?
The first thing you need to do is select the lock itself and the required tools for installation. Among the most necessary are the following:
- Chalk and a simple pencil, which will be required to complete the markings.
- Electric drill. It comes with a set of drills for woodworking. Their sizes range from 2 to 7 mm.
- Chisels. They must be sharp. Two pieces are enough - wide and narrow.
- A tape measure and a square for it.
- Hammer.
- A rasp with a coarse notch or a round file.
- Screwdriver. If it is not there, use an ordinary screwdriver.
After the tools are prepared, they begin to work. Installation is considered more difficult than installing an overhead. In the latter case, there is no need to cut a hole of a suitable size, so installing the lock or latch in the door is simple. In any case, it is important to know how to do it correctly and what to consider.
Installed lock with handle in a wooden door
The insertion of a lock of any type into a wooden door may be necessary for various reasons. The most common is the construction of a house and the installation of doors, mechanisms, handles and latches. However, replacing the lock on a wooden door is also common. The reasons are long-term use, breakdown, problems with functioning or hacking. In any of these cases, it becomes necessary to install a mortise lock on a wooden door.
Where to start?
The first stage of installation is the creation of a special groove or hole for the lock body. To do this, you need to make markings to determine at what height to mount the product. Most often, the height reaches 90-100 cm from the floor. But this size varies depending on ease of use. The height is selected for the people who will use the lock or latch and handle.
 Creating a groove for the plank using a chisel
Once you have determined the height, marking is done. To do this, the lock is applied to the door with the part that will be mounted in the hole on the door leaf. Using chalk or a pencil, outline the body of the product. The result is a mark that allows you to understand where the locking mechanism will be located.
The hole is cut using a feather drill. In this case, it is worth giving preference to the product that corresponds in width to the thickness of the lock. Drilling a hole is done in different ways. The first method involves carefully and gradually moving the drill inside the door leaf by 1-2 centimeters until the required mark is reached. The second method involves immediately drilling a hole.
The hole itself should be 1-2 mm larger than the width of the lock body. This will ensure unhindered entry of the lock into the created hole. It is recommended to hold the drill perpendicular to the end of the door and parallel to the surface. Align the edges of the hole using a hammer and chisel.
 Marking the lock on the end of the door leaf
Important! To hide the lock in the hole, make it 2-3 mm deeper than the width of the case.
Marking the strip and its installation is carried out in the same way. To do this, it is applied to the resulting hole and traced along the contour using a pencil. It is better to knock out along the intended lines using a chisel so as not to spoil the edges of the hole for the lock.
The next step is the hole for the mechanism
To install it in a wooden door, you should make sure there is a hole for the mechanism of the product. Only after this can you install a lock or latch on the door and begin installing the handle. Installation of the mechanism or cylinder itself requires precise markings. To do this, the lock body is placed opposite the previously obtained groove. The fastening elements are marked on the door leaf with a pencil. After this, the holes are drilled using a drill that matches the diameter.
 Attaching a latch to a wooden door
The result is grooves, the edges of which should be carefully leveled. It is best to use a file for these purposes, which will help you quickly deal with the problem. If you additionally plan to install a latch or handle, it is important to know how to properly embed the lock in this case. Installation involves drilling additional holes for the rods and screws that act as fasteners for the latch or handle.
We can assume that preparations for inserting the lock are complete. The lock should be inserted into the prepared grooves and secured using appropriate fasteners. All elements are attached using self-tapping screws and bolts; there is no need to use additional elements.
Last steps of installation work
The final stage of the work is to create a hole in the door frame for the normal functioning of the lock, latch or door handle itself. If you omit this moment, the door will not close properly and fit tightly. This should be done only after you have verified that the lock is functioning normally and that there are no problems or jams.
To mark the hole, apply a small amount of chalk to the tongue or crossbars of the mechanism. After this, the door is closed by turning the mechanism. As a result, you can see a chalk mark on the jamb. Here it is necessary to create holes for the crossbars of the mechanism or the tongue of the handle.
The principle of cutting holes is similar to cutting a hole for the lock or latch itself. There are no differences here. You can use a drill or hammer with a chisel, being careful not to remove excess material. If the markings are done correctly, you will end up with holes into which the lock bolts fit without problems. Now attach the locking plate in accordance with the markings. Special screws are used as fasteners. At this point, the installation of the lock is considered complete, and the door is ready for use.
 The final stage of installation work on installing a lock on a wooden door
Now you know how to insert the lock and handle to it. In general, installation of the mechanism is not difficult and can be done independently. Experts recommend that you carefully read the instructions before installing the lock, latch, handle and other mechanisms. This will allow you to understand how to install the lock and handle with the latch correctly, how to avoid problems and ensure long-term operation. If you have problems, you should contact professionals who will quickly correct the situation, providing your home with reliable protection from intruders.
A man should be able to do any housework: nail a shelf, fix a faucet, or cut a lock into a door. All this work requires not only skillful hands, but also knowledge. The following will provide instructions on how to fit the lock into the door correctly. This process is not that complicated, but it does require a certain level of preparation that any home owner should have.
A set of necessary elements for inserting a lock
In order to insert the locking element into the door correctly the first time, without damaging the material or deforming the surface, you need to have the necessary set of tools on hand. You cannot do without a drill or screwdriver, which must have a drilling function. This is necessary in order to make a hole in the door. To cut a hole of the correct shape and size, you will need a set of round bits.

They are well suited for drilling wood. You also need to have a hammer and chisel on hand, with which you can easily sand the hole and place the door closing device in it. In order to take the necessary measurements, you will need a tape measure, ruler or centimeter. To mark the desired points on the surface of the door itself, you can use a simple pencil. To fix the lock, you cannot do without a screwdriver. That's all the basic tools you need to mortise a lock yourself.
Before inserting the closing mechanism, it is necessary to determine its location on the surface of the door. To choose the most convenient position for the lock and handle, you should simply try to open an imaginary door while standing in front of the surface of the door without a lock. At what level the hand is, that’s where you need to make a hole so that opening and closing is simple and comfortable. If there is a child in the family, the lock needs to be installed a little lower so that the child does not experience discomfort when manipulating the lock handle. The place that was determined experimentally must be marked with a pencil directly on the surface of the door. The preparatory work is finished!
Marking the plane to perform the work

The next step in the closure mortising process is to make a hole in the door material. Before drilling, you need to accurately determine the place where the drill bit with the crown should be located. To do this correctly, you need to take the closing mechanism itself and use a tape measure to determine the distance from its visible edge to the hole for the pin, which organizes the entire operation of this device.
It is this distance from the edge of the door that needs to be marked at the height that was previously determined. Once the drilling location has been determined, you need to choose the right bit for the drill.
Proper selection of drill bits is the key to quality work
The main difficulty when choosing a crown for drilling is the correct selection of its diameter. It should be wide enough to accommodate the closing mechanism, but narrow enough that the hole will not be visible from the outside of the latch. To do this, you need to measure the height of the visible part of the latch and subtract a few centimeters from this distance. With such a hole diameter, the mechanism should go inside the door space, but the hole will not be noticeable under the cover of the lock body.
For those who are afraid of making mistakes in their calculations, there are special crowns that are made for making holes for door locks. Typically, such crowns are sold in a set of 2 instruments of different diameters. After the necessary measurements of the hole diameter have been made, you can begin drilling. There is one trick in the drilling process that allows you to produce high-quality work. To do this, you need to drill not on one side, but on both. First we drill one side to the middle, then the other. This will make the hole as even and smooth as possible.
How to cut a hole in the end?
After the hole on the plane has been cut, you should do the same at the end of the door. The mechanism itself for closing the door will be inserted into this space, so you need to make the hole carefully and carefully. The drill bit must be directed so that it is exactly in the middle of the door end. The size of the crown must be selected according to a principle similar to the process of selecting the diameter of the hole on the surface. In order for the lock insert to be considered complete, you need to make one more small touch. It is necessary to make a small recess so that the latch can be completely hidden at the end. If this is not done, it may cling to the door frame, which will create problems with opening the door.
Then you need to insert the closing mechanism into the hole and circle its entire visible part with a simple pencil. After this, the latch can be pulled out. Now you need to scrape out the void inside the door using a chisel. The recess which should result from this work must be sufficient to accurately accommodate the outer plate. This work must be done as carefully as possible, since too much empty space can damage the door, and the mechanism will wobble. Therefore, it is advisable to have experience working with a chisel.
Installing a lock in a hole

When all the holes and recesses are ready, you can move on to the final part - installing the lock. It is very important not to make mistakes. At first it may seem that there is no difference between the sides of the locking device. However, if it is equipped with a stopper, then there is this difference. The lock handles most often actually rotate in both directions, but the stopper only works in one direction. Therefore, it is necessary that it be directed towards the end. The stopper can be operated using a key or a separate latch.
Hole for locking tongue in door jamb
The main thing is not to forget that the hole for the latch tongue should also be on the door jamb. To do it correctly, you need to start taking measurements after the lock has been cut in and the door itself has been hung on its hinges. This hole should be where the tongue meets the door frame. The depth of the hole should be no less than the lock tongue. The most convenient way to make a recess in a door jamb is with a chisel.
Every man should know how to fit a lock inside a door himself.
Of course, many would entrust this task to a professional, but it is always more pleasant to do difficult work yourself. Then the result will bring real pleasure, and the person will gain invaluable experience.
You bought, say, a new interior door and decided to assemble the door frame yourself and install this very door, without any experience. Well, it happens that you have to do some things for the first time. The most important thing here is to take your time and be attentive to what you are doing.
When I had to install interior doors in one of the apartments for the first time, I must admit, while sawing the first frame, I made a mistake. As a result, I had to buy a new box set. Since then, I have been very attentive and careful when performing work on assembling and installing doors.
When sawing door frame elements there is no room for error, you need to remember this. As they say, measure twice - cut once!
So, the door was delivered and has been standing in the corridor, perhaps for the second week. There’s nowhere else to put it off and it’s time to get down to business. A reasonable question arises. Where to start?
Marking the door leaf for insertion
You should start by marking the place on the door leaf where it will be built-in handle with latch. The door leaf is, in fact, the door itself without additional elements, frames, extensions and trim.
First, decide in which direction the door will open; the position of the bevel of the latch tongue will depend on this. Now you need to determine the height at which the door handle will be located. As a rule, the handle is embedded at a height of 90-100 cm from the floor or threshold. There are, of course, no thresholds in the rooms. But in the bathroom or toilet, they are very possible.
In box with door handle, you will almost certainly find instructions with the dimensions by which you need to mark. Often the dimensions are indicated on the box itself. Ordinary handles are almost always installed in the same pattern. Construction tool stores sell special kits for inserting handles into interior door leaves. The set consists of a feather drill with a diameter of 23 mm. and wood crowns with a diameter of 50-54 mm.
So, mark a distance of 95 cm at the end of the door leaf. Using a square, draw a clear line perpendicular to the end of the door leaf. Mark the middle on it and mark it. You can use any sharp object, an awl, a nail or a self-tapping screw. At this point you will need to drill a hole for the latch. But don't rush, it's not time yet!
Need to continue markings for pen, or speaking professionally, for knoba. To do this, you need to extend the line at the end further onto the canvas itself on both sides. This must be done strictly perpendicular to the door leaf, using a square. It would be useful to remind you that the pencil must be sharpened.


Here you should pay attention to one detail. The handle can be positioned at a distance of 60 or 70 mm. from the edge. This can be done using the adjustable latch length design. Decide which distance suits you best and mark the desired distance on both sides of the canvas on the lines drawn earlier.
Please note that on a blank canvas, that is, one that does not have decorative elements in the form of slats, glass, etc., the distance from the edge where the handle will be embedded is not critical. After all, the canvas is absolutely even and smooth. But the presence of decorative inserts can limit the position of the handle. And if you decide to embed the handle at a distance of 70 mm. from the edge of the door leaf, be sure to make sure that the handle does not overlap the decorative elements. Otherwise, make a mark of 60 mm. from the edge.
Drilling a hole for the handle
Drills first hole for pen, then for latches. It is more comfortable. Firstly, when you start drilling the end, you will know exactly when to stop, and secondly, all the chips when drilling the end will simply fall down, and you will not need to sweep or blow them out with a vacuum cleaner, which is very inconvenient.
So, take a drill, attach a wood bit (50-54 mm) to the chuck and start drilling from one side, having previously marked the marked point. Do not try to drill through the entire canvas “in one go.” Firstly, the depth of the crown itself will not be enough, and secondly, the teeth of the crown will become clogged with sawdust, the crown will get very hot and burn the wood, and the deeper, the stronger. All we needed was a fire!
Having drilled 4-6 mm, without turning off the drill, pull it towards you, removing the crown from the drilled hole. There is no need to turn on the reverse and generally make sudden movements. Everything should happen smoothly but confidently.
Clean the teeth of the crown from sawdust. Be careful, it can be very hot! It all depends on the material of the door leaf and the degree of its humidity. The denser the material and the moister, the more the crown heats up. But the crown with blunt, ground teeth heats up the most. Never use this! Buy a new one is my advice.
Having cleaned the teeth of the bit, and allowed it to cool if necessary, immerse it in the same place where it was removed some time ago, and continue this important mechanical operation to obtain the hole we need so much. As I already mentioned, the crown, due to its limited depth, will not allow the canvas to pass through. Having drilled halfway, you should go to the other side and repeat the entire operation again. You need to be careful here. When approaching the middle of the canvas, do not press too hard, let yourself enjoy the last seconds of this exciting process! Otherwise, you risk the bit going through and hitting the door leaf hard with the drill. But we don’t want to scratch it or leave a dent, right?
Drilling a hole for the latch
Let's move on to the next stage. We remove the bit from the drill chuck, not forgetting about it elevated temperature. We clamp a feather drill with a diameter of 23 mm into the chuck. Pay attention to the photo. It shows that the drill is stamped with a size of 25 mm. But rest assured, no deception! It’s just that I didn’t have a drill of the required diameter, and I used a 25 mm “perk”, having previously ground its edges with a grinder to the required diameter. Here's a little trick, take note.
You need to drill strictly perpendicular to the end of the door leaf. At first I thought it was very difficult to control. I mean, perpendicularity. But then I realized that it was easy to do, just by observing how smoothly the drill selects the circle. This is especially noticeable at the beginning of drilling, and having gone a little deeper, you can hardly worry that the drill will deviate from the specified course. But this does not mean at all that you can relax and look not at the drill, but at a cat covered in sawdust passing by.


Installing a latch for an interior door
Well then! The drilling of the holes is completed, now you need to recess the latch bar into the end of the door leaf so that it is “flush” with the plane. Professionals do this using a manual milling machine, but not everyone has one, so you will have to work with a hammer and chisel.
Insert the latch into the hole and trace it with a sharpened pencil. To ensure that the strip stays in place while tracing, I usually immediately drill holes for the fastening screws and lightly tighten them, fixing the strip. Having traced the bar, remove the latch and take a chisel. Need I say that the chisel should not just be sharp, but very sharp?!
Installing a lock on an interior door will increase the comfort of your stay. This is very convenient as it allows you to restrict access small child into rooms where he could disturb adults or get injured. Therefore, cutting into a lock is a fairly common job that almost any homeowner can do.
When performing work on cutting into a lock, you will need the following tools:
- The lock itself, with a set of handles and bolts
- Square and pencil
- Drill
- Core drill, 5 cm in diameter
- Spade drill with a diameter of 23 mm
- Chisel
- Screwdriver or screwdriver.
Having a full set of tools will allow you to complete all stages of the work quickly and accurately. If something is missing, it is better to ask friends or acquaintances for a tool than to try to do without them, as this will lead to poor quality work and unsatisfactory appearance.
Marking
Usually the handle is located at a height of about a meter from the floor, so it will be convenient for use by people of any height. Therefore, we measure 95 - 100 cm from the bottom edge of the canvas and make a mark. Then, at the selected level, using a square, we mark the centers of future holes. On the end plane the center of the lock will be in the middle, and on the side plane it is necessary to retreat 6 - 10 cm from the edge. This is the place of the future lock and handle.


Drilling
Drilling holes for the lock starts from the end. A feather drill is installed in the drill and a hole about three centimeters deep is drilled exactly at the marked center. This is the place for the lock tongue.


After this, a core drill with a diameter of 5 centimeters is installed in the drill. Use it to drill holes on the sides. If you are not sure that you will be able to drill the hole horizontally, without distortion, then you need to mark it and drill on both sides. In this case, the drilling depth is equal to half the thickness of the door. If everything is done correctly, you will get a round through hole with a diameter of 5 centimeters, which has a side hole with a diameter of 23 millimeters.


Before installing the lock, you must cut out a recess for the latch. To do this, the lock is inserted into the door and the latch plate is outlined with a pencil. Along this contour, using a chisel and hammer, a recess with a depth of approximately 3 - 5 mm is selected, depending on the thickness of the plate. At the same time, a recess for the tongue is cut out on the door jamb according to the size of the special trim. This is where the lock tongue will go and hold the door closed. When both recesses are ready, the lock and recess are fixed to the jamb using the self-tapping screws that usually come with the kit.


Installation of handles
The further process does not cause any difficulties. The handle with screws is put into place first. The screws are unscrewed and the handle is inserted into the lock. To do this, the handle has a special square-section rod, which passes through the corresponding hole in the lock. After that, a second handle is put on this rod on the other side and secured with screws. Then decorative overlays and the handles themselves are put on. This completes the installation process.


After this, all that remains is to remove the debris and tools.
Useful notes
Even if you are confident in your abilities and know how to drill, it is better to work with a core drill from both sides. This will ensure a neat cut and there will be no chips or burrs on the surface of the door that will ruin its appearance.
It is better to drill a recess for the lock in the end of the door after the hole for the handles has been drilled. This way you will be sure that the hole is completely connected to the main one. Otherwise, you may need to drill out a hole for the lock.
When choosing a recess for the lock plate, work must begin with the outline. The entire contour is outlined with gentle blows, and only after this the wood is selected. This will prevent chips and cracks from appearing.
Do not over-tighten the screws on the handles. The fixation should be tight, but not excessive. Otherwise, dents may appear on the surface of the door, spoiling its appearance.
Video How to make a lock on a door
After installation, the question inevitably arises of how to fit a lock into an interior door. The door should close tightly, open easily and fit securely in the opening. All these tasks are easily handled by a lock or latch with a latch.
If possible, it is better to purchase doors with already built-in locks and handles. Otherwise, this issue will have to be resolved by inviting a master or installing locks yourself.
Lock selection
Just like the fittings, the lock should be in harmony with the interior, combined with the texture and color scheme of the decor. This largely depends on the design of the linings and handles.
As for functionality, two types of mechanisms are suitable for interior doors:
- Mortise lock with or without separately mounted handle.
- Latch lock. As a rule, it is located in the handle itself and has a round shape.
Recently, installing a magnetic door lock has become popular. Such a device often eliminates the need to install push- or rotary-type handles.
Using the magnetic mechanism is simple, and installing a magnetic lock with your own hands does not require the use of special tools. The installation of a magnetic device is used in cases where it is necessary to ensure quiet operation and complete absence of the risk of being scratched on the tongue or crossbars.
However, installing a lock on an interior door, depending on its type, has its own characteristics.
The thickness of the embedded door device should be no more than a third of the width of the end. It is recommended to work exclusively with well-sharpened tools. It is not recommended to install the lock at the junction of door bars.
Required Tools
To correctly insert a lock into the door with your own hands, you should prepare the appropriate tool:
- Drill and set of drill bits for wood.
- Milling cutter, chisel and carpenter's knife.
- Hammer.
- File.
- Screwdriver.
- Ruler or tape measure, pencil or chalk.

Features of the sidebar
The door material can be very different. Solid wood products are the easiest to work with. The fabric is homogeneous, you can assemble the structure yourself and it is impossible to make a mistake with the insertion location. Wood is more difficult to drill, but the likelihood of errors and flaws when working with your own hands is greatly reduced.
MDF doors are the most problematic in this matter. This is due to the fact that it is very important to hit the power beam, which is located by default at a height of one meter from the floor. But it’s easy to remove the old one and install a new one.
It is not recommended to install a mortise lock on PVC doors yourself. Without good skills and professional tools it is unlikely to succeed. The fact is that mistakes are almost impossible to correct.
To do this, use the same tools plus carbon paper or plasticine. With their help, marks are made on the crossbar on the jamb in the fully closed position of the door.
Lock installation
For do-it-yourself installation, there is a special algorithm or operating technology. To do everything correctly, you need to do the work in the following order:
- The first step is to dismantle the door. It is necessary to remove the platbands. You will also have to remove the old lock.
- Then the interior door should be removed from its hinges and placed edge-on on the floor with the hinges down.
- Then you need to take measurements of the height, thickness and width of the lock body.
- 100 cm is measured from the lower end of the canvas and a mark is applied. The second is planned from it at a distance equal to the height of the castle.

- Next, two parallel lines are drawn between the marks in the middle of the end of the blade, spaced from each other by the thickness of the locking product. As a result, at the end of the door you should get a rectangle exactly under the lock body.
- Now holes are drilled inside our rectangle. The drill bit should be equal to or slightly smaller in diameter than the thickness of the lock body. The first hole is made in the center, and then higher and lower. The depth of the hole should correspond to the width of the lock, but holes are first made one cm deep and then deepened to the desired size.
- Then the chisel comes into play. With its help, the correct cutout for the lock is formed. In the same way, a separate cutout is made for the handle.
- Now a cutout is made for the handle and lock on the side of the canvas. The lock body is applied to the blade and the position of the mechanism axis is marked. At this point a cutout is made for a cylinder or keyhole.
- When all the cutouts are ready, the actual installation process begins. The lock is inserted inside and, after checking the functionality, secured to the door with self-tapping screws. The lining at the end is screwed with self-tapping screws, also included in the kit.
- The handles are inserted and the linings are screwed on.
- The door rises and hangs again on its hinges.
- Then markings are made for the answer on the jamb. The door is closed and the position of the tongue is noted. An overlay is applied and its extreme positions are marked.
- The cutouts are made in the same way, after which the cover is screwed on with self-tapping screws.

Latch Installation
First, the insertion location is marked. This is done using the paper template supplied in the kit. As a rule, the latch is placed at the intersection of the following lines:
- Horizontal floor, held at a height of one meter.
- Vertical, held 6-7 cm from the edge of the canvas. This size depends on the depth of the halyard latch.
You can see the installation in the video:
Then the handle mechanism is inserted and the size of the opening under the lock plate is marked with a pencil. The sample can be made with a chisel. The handle is attached with self-tapping screws.
After this, the parts of the knob are connected with screws and a decorative ring is mounted. Then the door is closed and the position of the strike plate is marked on the jamb. A sample is made on the box for the tongue. A 2 mm cut is made under the rebate strip. Everything is fixed with self-tapping screws.
As you can see, there is nothing supernatural. It is quite possible to install a lock with your own hands if you do everything slowly and carefully. After installation, it makes sense to check the tightness of the fasteners, the fixation of the linings, the handle and the lock body. If all is well, the lock will last a long time.
Requires a minimum set of tools:
- Drill
- Chisel 19 mm
- Crown diameter 50 mm
- 23 mm spade drill
- Drill for wood or metal 4 mm
- Hammer
- crosshead screwdriver
- And a pencil
So, let's start cutting into the lock.


Drill a hole in the center with a 4mm drill bit.

We place the lock flush with the door and make a mark according to the fact

We drill through the hole with the same drill, maintaining a right angle.

Using a 50 mm crown we make a cut on one side of the door.
Attention!
Your specific case may require a different size crown.

Let's finish on the other side.


We take a self-tapping screw of a suitable length, close the door along the door frame and through the 50 mm hole, insert the self-tapping screw into the remaining 4 mm hole and, using pressure, make a mark in the door frame.


Using a 23mm feather drill, we cut a hole at the mark to a depth sufficient for the lock latch to engage.

Using the same drill, we drill a hole for the lock along the mark.

We insert the lock and make a mark with a sharp pencil to recess it into the door leaf.


Using a chisel, we make notches strictly according to the marks and make a selection so that the lock sits in the pocket, then we fasten it with self-tapping screws.

We begin to assemble the lock, insert the outer part into the grooves (as a rule, it does not require disassembly).


Then carefully remove the decorative “cup” sitting in the grooves, then press the latch and remove the handle.


We connect the two sides with screws.

We insert the handle so that the latch operates.

Snap the decorative “cup” into place.


We attach the striker, make a mark, use a chisel to remove the excess and screw it on.

Done!))) A correctly embedded lock closes freely by pressing the door leaf until it slams.
Video explanation for installing the lock
Instructions for installing a door lock (knob)
1.Marking the door

Apply markings on the door leaf to install the knob (lock) according to the template. Recommended distance from the floor is 965 mm.
2.Marking holes

After you have made the markings, drill two holes: 50 mm in diameter for the knob (lock) handle and 23 mm in diameter for the latch mechanism.
H. Installing the strike plate

Install the strike plate at the same height as the latch so that the additional tongue of the latch remains recessed into the body of the latch when closing, which is an obstacle when pressing.
4 Disassembling the knob (lock)
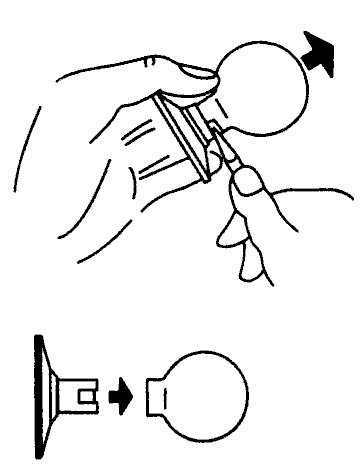
To disassemble the knob (lock), use a special key to press the spring-loaded latch at the place where the handle is attached and remove it.
5. Latch length adjustment

6. Installing the latch

Install the latch into the groove of the door (make sure that the bevel of the latch is directed towards closing the door). Install the cover plate with the rod so that the rod and coupling sleeves fit exactly into the grooves on the latch body.
7. Installing the knob trim(castle)

First, slide the inner jujube cover plate onto the rod and secure it with screws (or screws). Then screw on the outer part of the trim.
8. Handle installation

Install the handle so that the groove on the rod coincides with the groove on the knob handle, press the handle until it “clicks.”
9. Rearranging the mechanism in the halyard handle

For models of latches with a halyard handle (versions 01 and 03), installation is also provided for both left and right doors. To do this, it is necessary to remove the cylinder mechanism and the fixing mechanism from the handle body and swap them (according to the figure), in accordance with the side of the door opening.
Installation procedure.
1. Determine the installation location of the knob and apply markings, following the template and installation instructions.

2. Using the installed latch body, mark the installation location of the strike plate on the door jamb and select a groove for the strike plate.
3.Install the strike plate and secure it with screws.
4. Alternately check the operation of the knob from outside and inside the room.
5. For models of latches with a halyard handle (versions 01.03), installation on left and right doors is also provided. To do this, it is necessary to swap the locking mechanism and the cylinder mechanism from the handle body.

As you can see, fitting a lock into a door is not such a difficult task, the main thing is not to rush.
—————————————-
Photographer: Vladislav Mazitov